
This is a fantastic use case for object storage! Here’s an optimized, step-by-step tutorial content you can use for your website, focusing on clarity, efficiency, and real-world implementation.
🚀 Ultra-Fast Static Website Hosting: Object Storage + CDN
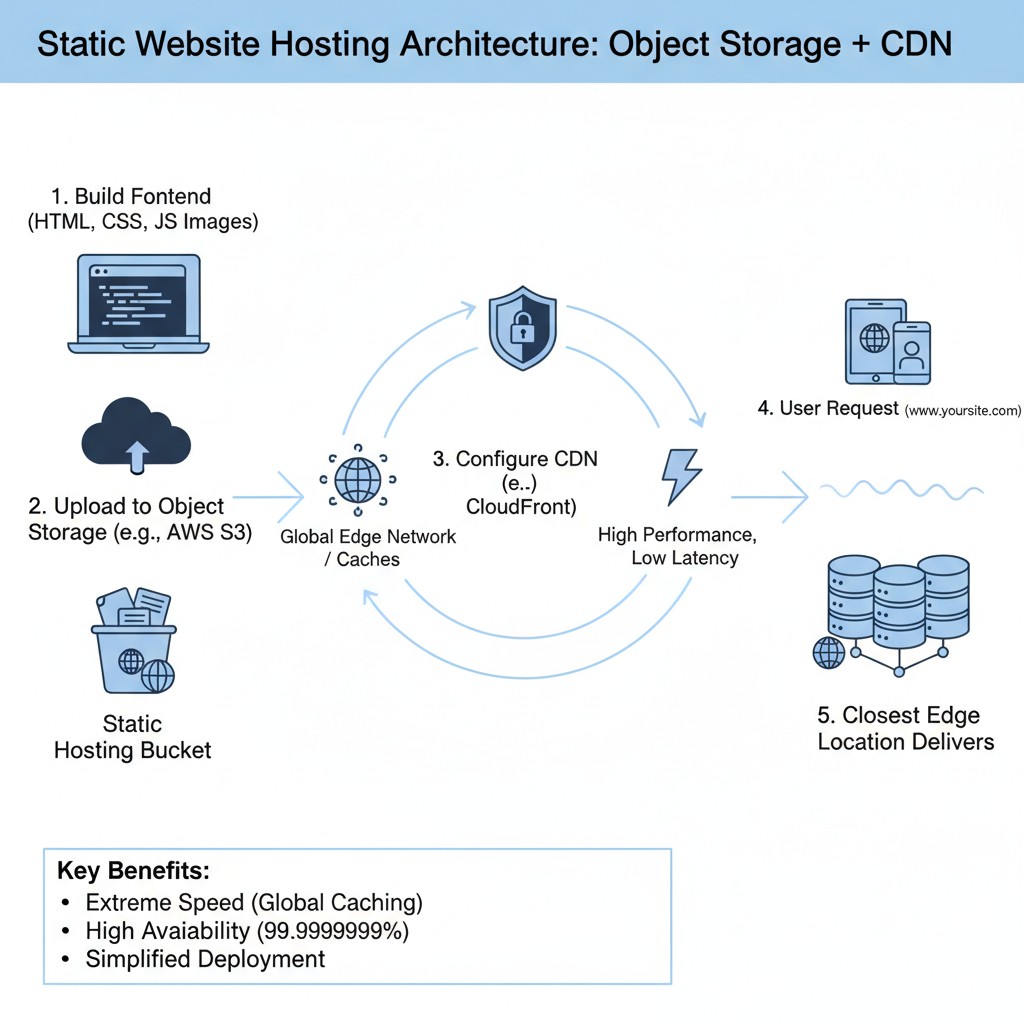
Harnessing the power of Object Storage (like AWS S3, Google Cloud Storage, or Azure Blob Storage) paired with a Content Delivery Network (CDN) (like CloudFront or Cloudflare) is the gold standard for deploying fast, reliable, and cost-effective static websites and frontend assets.
Why This Setup is the Best Choice
| Feature | Benefit |
| Global Speed | CDN Caching serves files from edge locations closest to the user, drastically reducing latency and load times globally. |
| Unmatched Reliability | Object storage is designed for 99.999999999% (eleven nines) durability. Your assets are virtually always available. |
| Massive Cost Savings | Pay only for storage and bandwidth consumed, which is significantly cheaper than running and maintaining dedicated web servers for static files. |
| Simplified Workflow | Zero server management required. Upload your files, configure the bucket, and you’re deployed. |
| Scalability | Automatically handles massive traffic spikes without any manual intervention. |
🛠️ Step-by-Step Implementation Guide
This flow is universal, regardless of your chosen cloud provider (e.g., AWS S3 + CloudFront, GCS + Cloud CDN).
Step 1: Prepare Your Static Assets
Ensure all your frontend files are ready for deployment. This includes:
- HTML files (e.g.,
index.html,404.html) - CSS stylesheets
- JavaScript bundles (especially for SPAs like React/Vue/Angular)
- Image and Font files
💡 Pro Tip: Always run a build process (e.g., Webpack, Vite) to minify and optimize your JS/CSS/HTML before uploading for maximum performance.
Step 2: Configure Your Object Storage Bucket
The Object Storage bucket will serve as the origin for your website content.
- Create a New Bucket/Container: Give it a unique, descriptive name (e.g.,
my-marketing-site-frontend). - Enable Static Website Hosting: In the bucket settings, specifically enable the “Static Website Hosting” feature.
- Specify Index & Error Documents:
- Index Document: Set to your main page, typically
index.html. - Error Document: Set to a custom error page, typically
404.html.
- Index Document: Set to your main page, typically
- Set Access Policy: Configure a Bucket Policy to grant public read access to all objects. This is crucial for a public website.
Step 3: Upload Your Files
Upload the contents of your build directory directly to the root of your newly configured bucket.
Example Command (using AWS CLI):
aws s3 sync ./dist/ s3://my-marketing-site-frontend –acl public-read
Step 4: Configure the CDN Distribution
The CDN acts as the global middleman, caching your files and serving them with lightning speed.
- Create a New CDN Distribution:
- Set Origin: Point the CDN’s Origin to your Object Storage Bucket Endpoint (the static website hosting endpoint, not the raw bucket URL).
- Default Root Object: Set this to your index document, usually
index.html. - Cache Behavior: Configure Time-To-Live (TTL) values for different file types.
- Set long TTLs (e.g., 1 year) for static assets that rarely change (images, fonts, fingerprinted JS/CSS).
- Set shorter TTLs (e.g., 5 minutes) for your
index.htmlto ensure users get the latest version quickly.
- SSL/TLS: Attach your custom domain and SSL certificate (the CDN handles the encryption).
Important Security Step (Origin Access Control/Identity): For the most secure setup, instead of giving the entire bucket public read access, configure an Origin Access Control (OAC) (or OAI on older CDNs). This ensures that files can only be accessed via the CDN distribution and not directly through the public bucket URL.
Step 5: Update DNS
The final step is to point your domain name to the CDN.
- Find the Domain Name provided by your CDN (e.g.,
d12345abcdefg.cloudfront.net). - Go to your Domain Registrar’s DNS settings.
- Create a CNAME or ALIAS/ANAME record for your website (
www.example.comor the rootexample.com) that points to the CDN’s domain name.
🎯 Example Scenario: React Single-Page Application (SPA)
This setup is ideal for SPAs, but requires one crucial detail for client-side routing:
| Problem | Solution |
User navigates to a sub-route (e.g., my-site.com/products) and hits refresh. The CDN asks the bucket for a file named /products, which doesn’t exist. |
Custom Error Page / Fallback: Configure the CDN to use index.html as the 404 Error Page. This ensures that any missing path returns the main application file, allowing your JavaScript router (like React Router) to take over and handle the route. |
This complete object storage + CDN workflow ensures your website is globally fast, always available, and incredibly cheap to operate.